Minecraft Shaders Draw the World Twice: Where Your FPS Actually Goes
Turn shaders on and your framerate falls to roughly a third. Not because the lighting is prettier — because your GPU now draws the entire world a second time, every frame, from the sun's point of view. One pack's developer puts that single pass at 60% of their shader's total cost. Here is where the rest goes, and what to turn down first.
By Shujaat Ahmed · · 8 min read
Every "best Minecraft shaders" list ranks packs by how they look. Almost none of them say what the pretty costs, and the ones that mention performance just label a pack "heavy" or "light" and move on.
That framing is wrong, and you can show it from the packs' own documentation. The gap between a single pack's lightest and heaviest preset is usually wider than the gap between two different packs. Which shader you install matters far less than which three settings it shipped turned on.
Here is where the frames actually go.
The second render nobody mentions
A shader pack's lighting has to know whether each pixel can see the sun. The standard way to answer that is a shadow map: before drawing the frame you can see, the GPU draws the entire scene again from the sun's position, storing only depth. Then, while shading your actual view, it compares each pixel's distance from the sun against that stored depth. Closer means lit. Further means something is in the way — so, shadow.
Every frame, your world is rasterised twice. Once for your camera, once for the sun.
In most games that second pass is modest, because most games are built from relatively few large objects. Minecraft is the opposite: thousands of chunks and an enormous amount of geometry, all of which has to be submitted again.
The developer of PrimeCinematic, one of the few shader authors who publishes numbers for their own pack, puts it plainly:
Rendering the shadow map is roughly 60% of this pack's GPU cost.
Sixty percent. Before a single reflection, bloom or light shaft.
Which Minecraft shaders are the most demanding?
This is the question people actually type, and the honest answer is that it aims at the wrong target.
Take PrimeCinematic's four published presets:
- Performance — shadows only. No ambient occlusion, no bloom.
- Balanced — everything on, 176-block shadows. The default.
- Cinematic — softer shadow edges, longer light shafts.
- Ultra — 2048 shadow map, 224-block shadows, 24-step light shafts.
That is one pack. The distance between its Performance and its Ultra preset is larger than the distance between most packs' defaults. Asking whether BSL is heavier than Complementary is like asking whether a van is faster than a car without saying which engine either one has — and the packs that ship heaviest by default are often just the ones whose author picked a flattering screenshot preset.
The useful question is not which pack. It is: what is switched on, and at what resolution? That is also why the maintenance status of a pack matters more than its ranking — a maintained pack is one that still gives you the settings to answer that question yourself.
Multiply your refresh rate by three
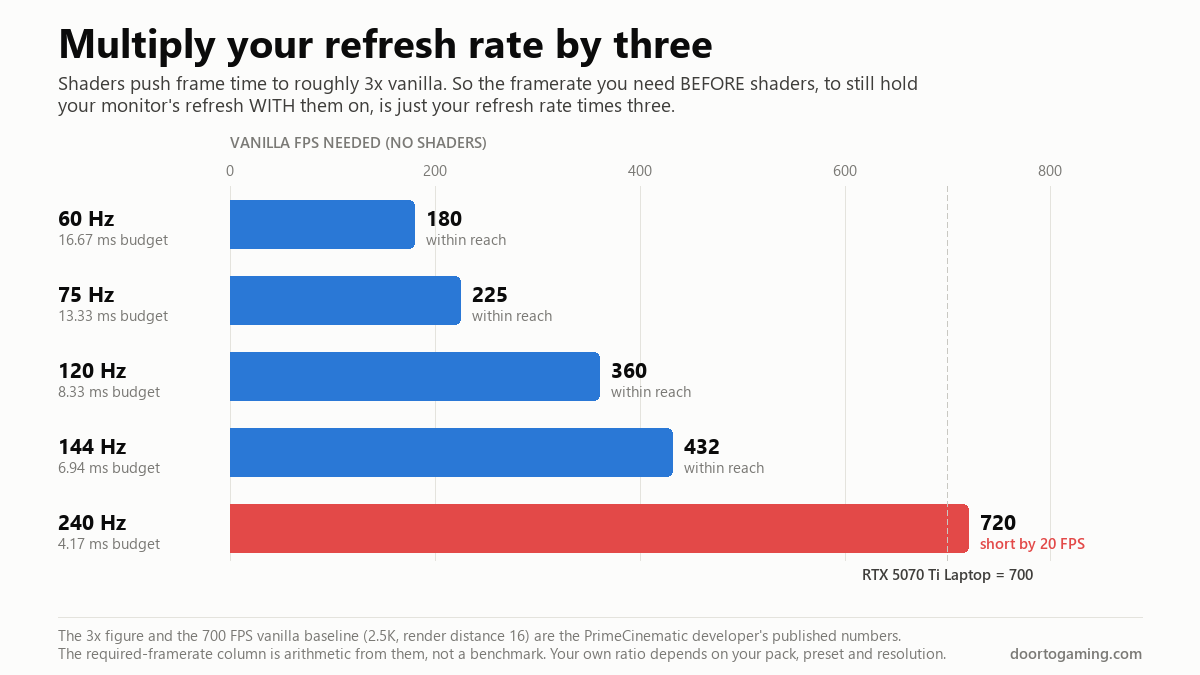
The same developer measured their own pack on an RTX 5070 Ti laptop at 2.5K with render distance 16: around 200–250 FPS on Balanced, against roughly 700 with shaders off. Their rule of thumb is to expect about a third of your vanilla framerate.
Percentages are slippery, so convert to frame time, which is the honest unit:
- 700 FPS is 1.43 ms per frame
- 225 FPS is 4.44 ms per frame
Shaders added about three milliseconds. Once you are thinking in milliseconds, "will this hold my monitor's refresh rate?" becomes arithmetic instead of hope, because a refresh rate is just a frame budget:
- 60 Hz gives you 16.67 ms
- 120 Hz gives you 8.33 ms
- 144 Hz gives you 6.94 ms
- 240 Hz gives you 4.17 ms
If shaders multiply your frame time by three, then holding a refresh target with them on means your vanilla frame time has to come in under a third of that budget — which means your vanilla framerate has to be at least three times your refresh rate.
That is the whole rule. Multiply your refresh rate by three. That is the framerate you need before you install anything. 144 Hz wants 432 FPS vanilla. 240 Hz wants 720.
It is worth checking that against the one real measurement in play. That laptop managed roughly 700 FPS vanilla — twenty short of the 720 the rule demands for 240 Hz. So the rule predicts it should land just under 240 FPS with shaders on. It measured 200–250.
One data point from one pack is not a law, and the 3x ratio moves with your pack, preset and resolution. But it is a far better starting estimate than "heavy" or "light", and it costs nothing: press F3, read your vanilla framerate, divide by three.
Shadow resolution is the lever
If the shadow pass is 60% of the cost, the shadow map's resolution is the setting that moves it — and it moves quadratically. Doubling the resolution quadruples the texels:
- 1024 × 1024 = 1.05 million texels
- 2048 × 2048 = 4.19 million
- 4096 × 4096 = 16.8 million
A 4096 map is sixteen times the work of a 1024 one. Some packs ship 4096 by default, which is where a lot of unexplained "this pack is heavy" reputations come from.
PrimeCinematic's developer estimates that "dropping 2048 to 1024 typically buys 15–40%", and is explicit about which knob to reach for: "Shadow Resolution is the lever, not Shadow Distance." Cutting distance instead makes far terrain go flat-lit, which looks considerably worse for what it saves you.
One caveat worth repeating, from shaderLABS, the shader developers' own wiki: change this inside the shader pack's options screen, under something like "shadowmap resolution" — not in OptiFine's global shadow quality setting. The global one has "a greater potential to cause bugs", and some packs, PTGI among them, "break completely" if you change it.
Render distance is paid twice
shaderLABS is blunt about render distance: raising it "lowers your performance exponentially", and they recommend staying under 16 chunks with shaders on.
It bites harder with shaders than without, and the second pass is why. Here is the chunk count inside each setting:
- 8 chunks: 289
- 16 chunks: 1,089
- 24 chunks: 2,401
- 32 chunks: 4,225
Going from 16 to 32 is not double. It is almost four times the chunks — and a large share of that geometry gets submitted a second time from the sun's angle, bounded by shadow distance rather than by what happens to be in front of you. Frustum culling rescues you less than it does in vanilla, because the sun's view is not your view.
If you have already touched shadow resolution, render distance is the next number, and it is the one most people have set far higher than they need.
Light shafts are the other big number
Volumetric light shafts — the god rays through trees — are raymarched. For every pixel, the shader steps along the ray toward the light a fixed number of times and accumulates what it finds. PrimeCinematic's Ultra preset uses 24 steps.
At 2560 × 1440 that is 3.7 million pixels times 24 steps: about 88 million samples per frame. At 60 FPS, 5.3 billion samples a second, for one effect.
Most packs run the shaft pass at half resolution, which cuts it to roughly 22 million samples a frame — still the most expensive thing on the list after shadows. If your pack exposes a step count or a shaft quality slider, it is the third number to reach for.
What to turn down, in order
- Shadow resolution, in the pack's own options. 4096 to 2048 is the biggest single win available, and on most screens you will struggle to see what you gave up.
- Render distance. Under 16 chunks with shaders on. You are paying for every chunk twice.
- Light shaft steps or volumetric quality, if your pack exposes it.
- The preset itself. Dropping from Ultra to Balanced, or Balanced to Performance, is one click and usually beats an hour of individual tuning.
- Leave render quality at 1x. shaderLABS: "2x on a 1080p monitor will effectively be running at 4k, for example, which causes a huge performance loss."
- Anisotropic filtering off. There is a "large performance loss going from off to 2x" and "almost nothing going from 2x to 16x" — so if you want it at all, skip straight to 16x.
Notice what is not on that list: the pack. Swapping one well-built pack for another at matching settings rarely moves the needle the way a single resolution step does.
Two things this does not cover. If your frames are fine but the game still hitches, that is a different problem with different causes — frame time, not framerate, is what you want to look at, and the same confusion turns up in Unreal Engine 5. And none of this applies to Bedrock, which cannot load Java shader packs at all and handles its lighting a completely different way.
The short version
- A shader pack draws your world twice every frame — once for your camera, once for the sun. That second pass is roughly 60% of the cost.
- Which pack you install matters less than which preset. One pack's own presets usually span a wider range than two different packs do.
- Expect about a third of your vanilla framerate, so multiply your refresh rate by three. That is the vanilla FPS you need before installing anything. 144 Hz wants 432. 240 Hz wants 720.
- Shadow resolution is the lever, and it is quadratic. 4096 is sixteen times the work of 1024.
- Render distance costs double under shaders. Stay under 16 chunks.
- Measure in milliseconds, not percentages. Percentages hide which change actually did anything.
Tags: Minecraft shaders Minecraft shaders 2026 Minecraft graphics Minecraft shader packs Frame Time Minecraft shader performance most demanding Minecraft shaders Minecraft FPS shadow mapping Iris shaders OptiFine shader settings
Written by Shujaat Ahmed
Shujaat Ahmed is the founder and editor of Door To Gaming. A lifelong gamer, he writes about the games, hardware, and industry news he cannot stop thinking about.